

 Melo Villareal
Complete GCash Verification Guide: Requirements, Steps, and FAQs
Having a fully verified GCash account can make your digital wallet more useful. Verification confirms your identity and gives you access to additional GCash features, as well as higher wallet and transaction limits.
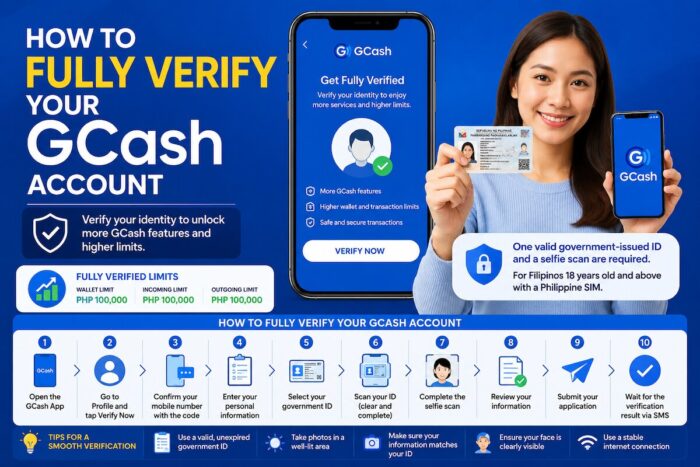
How to Fully Verify Your GCash Account
For Filipino users aged 18 and above with a Philippine SIM, GCash requires one valid government-issued ID and a selfie scan for verification. The verification process can be completed through the GCash app.
If you are still using a Basic GCash profile, here’s a detailed guide on how to get fully verified, the documents you need, what to do if your application is rejected, and what to expect after verification.
What Does a Fully Verified GCash Account Mean?
A Fully Verified GCash account is an account whose user’s identity has been successfully validated by GCash.
New GCash users initially have a Basic Profile. Fully verifying the account unlocks additional services and higher wallet and transaction limits.
A Basic account can be used for services such as paying bills, buying load, cashing in, and Scan to Pay. A Fully Verified account provides access to additional features, including sending money, bank transfers, online payments, GCash Card, GSave, GInvest, GInsure, and other services, subject to applicable eligibility requirements.
Basic vs. Fully Verified GCash Limits
According to GCash’s current information, the standard limits are:
| Account Type | Wallet Limit | Incoming Transaction Limit | Outgoing Transaction Limit |
|---|---|---|---|
| Basic Profile | PHP 10,000 | PHP 5,000 | PHP 5,000 |
| Fully Verified | PHP 100,000 | PHP 100,000 | PHP 100,000 |
You can check your actual limits in the app by going to Profile > Profile Limits.
Keep in mind that GCash may have separate eligibility requirements and risk evaluations for higher limits or particular financial products.
Who Can Get a Fully Verified GCash Account?
For a regular GCash account, the verification process applies to Filipinos aged 18 and above using a Philippine SIM.
GCash also has separate account types and verification requirements for GCash Jr., GCash Overseas, GCash for Tourists, and foreigners residing in the Philippines.
This guide focuses primarily on the standard GCash account for Filipinos aged 18 and above with a Philippine SIM.
What Do You Need to Fully Verify GCash?
The basic requirement is straightforward: one valid government-issued ID.
The ID should be valid, unexpired, clear, and undamaged. For most accepted IDs, you need to submit the actual physical ID rather than a scanned, photocopied, or xeroxed version. National ID is an exception because GCash accepts card, paper, and digital versions.
Accepted IDs for Filipino Users
GCash currently lists the following IDs for Filipinos aged 18 and above:
- National ID — card, paper, or digital
- Philippine Passport
- HDMF (Pag-IBIG Loyalty Plus)
- Driver’s License or BLTO Driver’s License
- Philippine Postal ID
- PRC ID
- UMID
- SSS ID
If you don’t have one of the accepted IDs, you can obtain a National ID. If you have already applied for a National ID but don’t have the physical copy, you may be able to use your Digital National ID through the eGov PH app.
How to Fully Verify Your GCash Account
The entire process can be completed inside the GCash app.
Step 1: Open the GCash App
Log in to your GCash account using your registered mobile number and MPIN.
Before starting, make sure you’re using the latest version of the app and have a reliable internet connection.
Step 2: Go to Your Profile
From the GCash home screen, tap Profile.
Look for the verification option and tap Verify Now.
Step 3: Start the Verification Process
Tap Get Started.
GCash will display reminders and instructions about the verification process. Read these carefully before proceeding, then tap Next.
Step 4: Confirm Your Mobile Number
Enter the six-digit verification code sent to your registered mobile number.
Tap Next after entering the code.
Never share this verification code with another person. Legitimate GCash representatives should not ask you to disclose your OTP or MPIN.
Step 5: Enter Your Personal Information
The app will ask for information such as your date of birth and citizenship.
For a regular Filipino GCash account, confirm that you are a Filipino citizen and make sure your personal information is accurate before proceeding.
It is important that the information you provide matches the details on your identification document.
Step 6: Select Your ID
Tap Select ID and choose the government-issued ID you intend to use.
Make sure the document is:
- Valid and not expired
- Clear and readable
- Not damaged
- Fully visible when photographed
- An accepted ID type
For regular verification, avoid submitting a photocopy or scanned copy unless it is a National ID format specifically accepted by GCash.
Step 7: Scan Your ID
Follow the instructions displayed in the app to capture your ID.
Take the photo in a well-lit area. Make sure the entire ID is inside the frame and that important information isn’t obscured by glare, shadows, fingers, or other objects.
Blurry or cropped images can cause verification problems.
Step 8: Complete the Selfie Scan
After submitting your ID, GCash will ask you to complete a selfie scan.
Find a location with good lighting and a simple background. Keep your face fully visible and follow the movements or instructions shown by the app.
Remove glasses or face masks for the selfie and make sure your face is clear and unobstructed.
Step 9: Review Your Information
Before submitting your application, carefully review the information you’ve entered.
Check your:
- Full name
- Birthday
- Citizenship
- ID information
- Other personal details requested by the app
If something doesn’t match your ID, correct it before submitting.
Step 10: Submit Your Application
Once everything is correct, tap Submit.
GCash will review your application and send an SMS with your verification status. Verification may take several days, depending on the review process.
Tips to Get Verified Successfully
A few simple preparations can help prevent unnecessary delays.
Use a Good Quality ID
Don’t use an expired, damaged, blurry, or difficult-to-read ID.
Your name and other personal information should be clearly visible.
Use Good Lighting
Take your ID photo and selfie in a bright area.
Avoid harsh glare, dark rooms, and shadows. Good lighting makes it easier for the verification system to read your ID and recognize your face.
Make Sure Your Face Is Clearly Visible
For the selfie scan, remove anything that covers your face, such as a mask. If instructed by the app, remove your glasses as well.
Check That Your Information Matches
One of the most important steps is making sure the information you enter in the app matches your ID exactly.
A mismatch between your submitted information and your identification document can result in an ID scan or verification error.
Don’t Crop the ID
The entire document should be visible when you take the photo.
Avoid cutting off the edges or covering important details with your fingers.
Use a Stable Internet Connection
A reliable connection can help prevent interruptions while uploading your ID and completing the selfie scan.
What If Your GCash Verification Is Rejected?
Don’t panic if your first verification attempt doesn’t go through.
Check the reason provided in the SMS notification. Common problems include selfie errors, ID scan or quality issues, information mismatches, and failure to provide requested additional documents.
If Your Selfie Was Rejected
Try again with:
- Better lighting
- A simple background
- Your entire face is visible
- No glasses or face mask
- A stable internet connection
- Properly following the selfie movements shown in the app
If the app allows you to resubmit, complete the process within the specified period.
If Your ID Was Rejected
Check whether:
- The ID is still valid
- The ID is an accepted document
- The photo is clear
- The entire ID is visible
- The information matches what you entered
- The image isn’t blurry or cropped
Try taking another photo using the original, valid ID in good lighting.
What If You Are Using a National ID?
GCash accepts National ID in card, paper, and digital formats.
National ID verification may include an additional selfie scan to match your information against Philippine Statistics Authority records. This process may be different from the regular GCash selfie scan.
If you encounter problems, double-check that your information matches your National ID and make sure you have a stable internet connection. You may also try another accepted ID if one is available.
What Happens After You Become Fully Verified?
Once your verification is approved, your account gains access to features available to Fully Verified users.
These can include services such as sending money, bank transfers, online payments, GCash Card, GSave, GInvest, GInsure, and other features, depending on individual eligibility requirements.
Your standard wallet limit also increases from PHP 10,000 for a Basic Profile to PHP 100,000 for a Fully Verified account. The listed incoming and outgoing transaction limits also increase from PHP 5,000 to PHP 100,000.
Can You Increase Your GCash Limit Beyond PHP 100,000?
Yes, but becoming Fully Verified alone does not automatically mean you will receive the higher limit.
GCash may allow eligible users to increase their wallet limit to up to PHP 500,000. Additional eligibility requirements apply, including maintaining a Fully Verified account and regularly using GCash for activities such as purchases, bill payments, and money transfers.
Wallet-limit upgrades remain subject to GCash’s risk evaluation and other applicable requirements.
Certain qualifying activities may also help users become eligible for a higher wallet limit, including linking selected accounts and using certain GSave or GFunds services, subject to applicable conditions.
Keep Your GCash Information Updated
Verification isn’t necessarily a one-time process forever.
Fully Verified users may periodically be required to update their account information. GCash can send reminders through SMS and the GCash app inbox.
Failure to update information by the required deadline can result in an account being downgraded from Fully Verified to Basic.
If GCash asks you to update your information, follow the instructions in the app and provide the requested information or documents.
GCash Verification FAQs
How long does GCash verification take?
Verification may take several days. GCash will notify you through SMS or the app when there is an update on your verification application.
How many IDs do I need for GCash verification?
For a standard GCash account, you generally need one valid government-issued ID from the accepted list.
Can I use an expired ID?
No. Your ID should be valid and not expired.
Can I use a photocopy of my ID?
Generally, no. Use the original physical ID unless GCash specifically accepts the particular digital or paper format, such as supported versions of the National ID.
Can I use my Digital National ID?
Yes. Digital National ID is among the accepted identification options for eligible Filipino users.
What if I don’t have a government ID?
Consider applying for a National ID. If you have already registered but haven’t received the physical card, you may be able to access your Digital National ID through the eGov PH app.
Why does my selfie keep failing?
Common causes include poor lighting, a blurry image, an obstructed face, or not following the selfie instructions correctly.
Try again in a bright location with a simple background. Keep your face fully visible and follow the movements shown in the app.
Why doesn’t my ID scan work?
Your ID may be blurry, damaged, expired, cropped, poorly lit, or inconsistent with the personal information you entered.
Try taking another photo using the original, valid ID in good lighting.
Can I resubmit after a failed verification?
Yes. If your verification fails, check the reason provided by GCash and follow the instructions for resubmission.
If the app provides a deadline for resubmitting, make sure you complete the process within that period.
What should I do if my verification was rejected?
First, identify the reason for rejection. Check your SMS notification and the GCash app for instructions.
If the problem involves your ID, submit a clearer image or use another accepted ID. If the problem concerns your personal information, make sure it matches your identification document.
If you believe the rejection was made in error, contact GCash support through official GCash channels.
Will I automatically get a PHP 500,000 limit after verification?
No. Fully verifying your account provides the standard Fully Verified wallet limit of PHP 100,000. A higher limit, potentially up to PHP 500,000, requires additional eligibility and is subject to GCash’s evaluation.
Can a Fully Verified account become Basic again?
Yes. An account may be downgraded if required account information updates are not completed within the specified period.
Is verification necessary to use GCash?
You can use certain GCash services with a Basic Profile, including paying bills, buying load, cashing in, and Scan to Pay.
However, Fully Verified status provides access to additional services and higher limits.
Final Tips Before You Submit
Before starting the verification process, prepare your valid ID and make sure your phone has a working camera and a reliable internet connection.
For the smoothest experience:
- Choose an accepted, unexpired ID.
- Make sure your personal information matches your ID.
- Take your ID photo in good lighting.
- Make sure the entire ID is visible.
- Complete the selfie scan in a bright location.
- Follow every instruction shown in the app.
- Review your information carefully before submitting.
- Watch for the SMS notification about your application.
- If verification fails, check the reason and correct the specific problem before resubmitting.
- Keep your GCash information up to date even after becoming Fully Verified.
Fully verifying your GCash account is relatively simple, but accuracy matters. Preparing the right ID, submitting clear photos, and ensuring your information matches your documents can help minimize verification issues and give you access to more services and higher limits available to Fully Verified users.
Note: GCash requirements, available features, and transaction limits can change. Always check the latest instructions displayed in the GCash app before submitting your verification application.
Follow and subscribe to OutofTownBlog.com on Facebook, Twitter, Instagram, Pinterest, and YouTube for more Travel-related updates.
Read:
- GCASH to MAYA: Guide to Sending Money from GCash to PayMaya (and Vice Versa)
- 10 Things to Check Before Buying Travel Insurance
- BPI to GCASH: How to Transfer Money from BPI Account to GCash
- 3 Easy Ways on How to Cash Out via GCASH


