

 Melo Villareal
HOW TO REGISTER YOUR SIM CARD IN THE PHILIPPINES: Smart, TM, TNT, Globe, DITO, and GOMO
The SIM Registration Act was implemented last December 2022 to combat scammers and spammers in the Philippines. This means that all mobile users in the country will have to register their SIM cards, old or new, on their telco provider’s platform. Starting December 27, new SIMs will be on ‘deactivated mode,’ which means that before you can use your SIM card, you’ll have to register first. If you’re not digital-savvy or a foreigner in the Philippines, you must have many questions about how to do the registration.
SIM Card Registration in the Philippines started last December 27, 2022, and it applies to postpaid and prepaid subscribers. Philippine SIM users must complete the sim registration until July 25, 2023. We are sharing the step-by-step instructions on registering your Sim Card from Globe, TNT, SMART, TM, DITO, and GOMO.
Why it is mandatory to register SIM Cards in the Philippines?
The Philippines has implemented the SIM Card Registration Act (Republic Act No. 11934), which makes it mandatory for all subscriber identity module (SIM) cards in the country to be registered. This legislation, approved by President Ferdinand Marcos Jr., aims to bolster security measures, combat criminal activities, and provide law enforcement agencies with the capability to monitor and identify individuals who may be using mobile phones for illicit purposes. Additionally, this measure seeks to safeguard the privacy and security of mobile phone users in the Philippines.
GLOBE SIM cards registration: A step-by-step guide
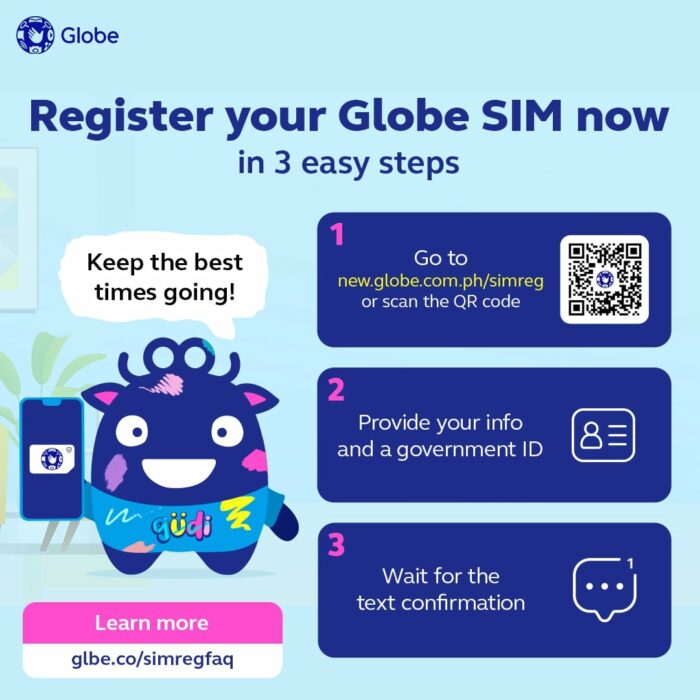
How to register your Globe prepaid sim:
- Step 1: Go to Globe’s SIM registration website.
- Step 2: Enter your 10-digit mobile number and tap ”Register.”
- Step 3: Get the One-Time Pin (OTP) text message and validate. Note: The OTP expires in five minutes.
- Step 4: After validation, fill out the registration form.
- Step 5: Take a photo of yourself and select your government ID to be uploaded. Tap “attach” and upload a picture of your valid ID.
- Step 6: Tick the privacy checkbox.
- Step 7: Click “Submit.”
- Step 8: Once finished with Globe sim card registration, a reference number will appear on the screen. Screenshot or keep the reference number as proof.
How to register SIM for New Globe At Home Prepaid WiFi subscribers?
- Step 1: After purchasing your Home Prepaid WiFi kit, go to Globe’s SIM registration website.
- Step 2: Set up your modem by connecting the power adapter to the modem and turning the device on.
- Step 3: Enter your Globe At Home Prepaid WiFi number on the sim cards registration page and tap “Register.”
- Step 4: Get the One-Time Pin (OTP) text message and validate. Note: The OTP expires in five minutes.
- Step 5: Access the device’s inbox.
– Connect to the network that matches the SSID and password at the back of the device.
– Open a new browser window. Type http://192.168.254.254/ on your browser.
– Tap “Login.”
– Enter your username and password found at the back of your modem.
– Tap “Device” to see the OTP message. - Step 6: Disconnect from your Globe At Home Prepaid WiFi and reconnect to your internet connection.
- Step 7: Go back to the page and enter the six-digit OTP on the registration page.
- Step 8: After validation, fill out the registration form.
- Step 9: Take a photo of yourself and select your government ID to be uploaded. Tap “attach” and upload a picture of your valid ID.
- Step 10: Tick the privacy checkbox.
- Step 11: Click “Submit.”
- Step 12: Once finished, a reference number will appear on the screen. Screenshot or keep the reference number as proof.
How to register SIM for Existing Globe At Home Prepaid WiFi subscribers
- Step 1: Connect to your Globe At Home Prepaid WiFi and subscribe to an internet promo.
- Step 2: Go to Globe’s SIM registration website.
- Step 3: At the simcard registration page, enter your Globe At Home Prepaid WiFi number and tap “Register.”
- Step 4: Get the One-Time Pin (OTP) text message in your modem inbox.
- Step 5: Access the device’s inbox.
Open a new browser window. Type http://192.168.254.254/ on your browser.
Tap “Login.”
Enter your username and password found at the back of your modem.
Tap “Device” to see the OTP message. - Step 6: Go back to the page and enter the six-digit OTP on the registration page.
- Step 7: After validation, fill out the registration form.
- Step 8: Take a photo of yourself and select your government ID to be uploaded. Tap “attach” and upload a picture of your valid ID.
- Step 9: Tick the privacy checkbox.
- Step 10: Click “Submit.”
- Step 11: Once finished, a reference number will appear on the screen. Screenshot or keep the reference number as proof.
New MyFi subscribers
- Step 1: After purchasing a Globe Mobile WiFi, set it up based on the instruction manual.
- Step 2: Connect your phone to your MyFi device.
- Step 3: Access the device inbox and do the following:
Open a new browser window. Type http://192.168.8.1/ on your browser to access the MyFi dashboard.
Tap “Login.”
Enter your username and password found at the back of your modem.
Click “SMS” to see the messages. - Step 4: View the welcome message and tap the registration link to the Globe’s SIM registration website.
- Step 5: Visit the link while connected to an internet connection.
- Step 6: Enter your MyFi number and tap “Register.”
- Step 7: Get the One-Time Pin (OTP) text message on your device inbox. Make sure you’re connected to your MyFi device.
- Step 8: Enter the six-digit OTP on the registration website.
- Step 9: After validation, fill out the registration form.
- Step 10: Take a photo of yourself and select your government ID to be uploaded. Tap “attach” and upload a picture of your valid ID.
- Step 11: Tick the privacy checkbox.
- Step 12: Click “Submit.”
- Step 13: Once finished, a reference number will appear on the screen. Screenshot or keep the reference number as proof.
- Step 14: Once the sim card registration is successful, a message will be sent to your device inbox.
For Existing MyFi customers
- Step 1: Connect your phone to the MyFi device.
- Step 2: Access the device inbox per the user instruction manual.
- Step 3: Access the device inbox and do the following:
Open a new browser window. Type http://192.168.8.1/ on your browser to access the MyFi dashboard.
Tap “Login.”
Enter your username and password found at the back of your device.
Click “Device” to see the messages. - Step 4: View the welcome message and tap the registration link to the Globe’s SIM registration website.
- Step 5: Visit the link to register.
- Step 6: Enter your MyFi number and tap “Register.”
- Step 7: Enter the six-digit OTP on the registration website.
- Step 8: After validation, fill out the registration form.
- Step 9: Take a photo of yourself and select your government ID to be uploaded. Tap “attach” and upload a picture of your valid ID.
- Step 10: Tick the privacy checkbox.
- Step 11: Click “Submit.”
- Step 12: Once finished, a reference number will appear on the screen. Screenshot or keep the reference number as proof.
- Step 13: Once registration is successful, a message will be sent to your device inbox.
For Globe Mobile Postpaid, Globe Platinum, Globe LTE@Home, and Globe Business Postpaid subscribers, Your information is already with Globe, and they will contact you to confirm your details and complete your SIM registration.

SMART SIM card registration: A quick guide

How to complete SIM registration for Smart Prepaid and TNT subscribers
- Step 1: Go to the Smart SIM Registration website here.
- Step 2: Enter your 10-digit mobile number and tap “Send OTP.”
- Step 3: Tick the box to confirm you’ve read their Terms and Conditions and Privacy Policy.
- Step 4: Enter your OTP and verify.
- Step 5: Fill out your information and attach a copy of your government ID.
- Step 6: Wait for an SMS confirmation. Save a copy of your control number.
For Smart Bro Prepaid and Rocket SIM users
- Step 1: Insert your Smart Bro or Rocket SIM into a mobile device.
- Step 2: Go to the Smart SIM Registration website.
- Step 3: Enter your 10-digit mobile number and tap “Send OTP.”
- Step 4: Tick the box to confirm you’ve read their Terms and Conditions and Privacy Policy.
- Step 5: Enter your OTP and verify.
- Step 6: Fill out your information and attach a copy of your government ID.
- Step 7: Wait for an SMS confirmation. Save a copy of your control number.
For Smart Bro Pocket WiFi, Plug-Its, Smart Bro, or PLDT Home WiFi subscribers
- Step 1: Go to the Smart SIM Registration website.
- Step 2: Enter the 10-digit mobile number of your SIM and tap “Send OTP.”
- Step 3: Receive your OTP by accessing your SMS inbox via your device’s dashboard.
Connect your gadget to the WiFi signal of your modem.
Type https://192.168.1.1 on your browser.
Tap “Advanced,” then click Proceed to 192.168.1.1 (unsafe). You’ll be redirected to Smart’s dashboard.
Enter your username and password.
Note: for first-time users: enter the default username and password, which can be found in your user manual.
Go to the SMS tab and check your inbox for the OTP. - Step 4: Tick the box to confirm you’ve read their Terms and Conditions and Privacy Policy.
- Step 5: Enter your OTP and verify.
- Step 6: Fill out your information and attach a copy of your government ID.
- Step 7: Wait for an SMS confirmation. Save a copy of your control number.
For Smart Postpaid subscribers
Your information is already with Smart, and they will contact you to confirm your details and complete your SIM registration.
Note: You may book a Smart Store appointment, chat with an agent, or call their hotline at 02-8888-1111 should you need help registering your Smart SIM. Learn more about Smart’s SIM registration here.
GOMO Sim Card Registration
GOMO has one of the most accessible and convenient SIM Card registration and activation processes. By default, all existing GOMO subscribers are considered substantially registered from when you created your account in the GOMO app with accurate and truthful information.
How to Register SimCard from GOMO
- Turn on your device’s mobile data and open your GOMO PH App.
- Input your GOMO mobile number and click the “Let’s Go!” button.
- Tap the “Proceed” button. Waif for the 6-digit OTP (one-time PIN) code in your inbox.
- Input the OTP in the app to verify.
- On the account registration form, fill in the fields to create your account ( Name, GOMO mobile number, Gender, Email address, and Birthday).
- After entering the correct information, tick the “I agree” checkbox and tap the “Create Account” button.
- Next, set your 6-digit PIN and option to enable biometrics (fingerprint sensor/face recognition) for easy login.
- You will be prompted with a “Successful Account Creation” notification.
- Tap the “Get Started” button to complete your registration.
Sim Card Registration For DITO subscribers
- Step 1: Download the DITO app.
- Step 2: Tap the “SIM Registration” banner in the app.
- Step 3: Enter your 10-digit mobile number, then tap “Register.”
- Step 4: Enter the OTP sent to your mobile number and validate.
- Step 5: Input the needed details.
- Step 6: Take a selfie and upload a copy of a valid ID.
- Step 7: Tick the check box of DITO’s privacy notice.
- Step 8: Submit and save a copy of your reference number as proof of registration.
Learn more about DITO’s SIM Registration here.
List of Acceptable IDs
You may use any of these valid IDs to attach to your SIM card registration:
- Passport
- Philippine identification
- SSS ID
- GSIS E-Card
- Driver’s License
- NBI Clearance
- Police Clearance
- Firearms’ License to Own and Possess ID
- PRC ID
- Integrated Bar of the Philippines ID
- OWWA ID
- BIR ID
- Voter’s ID
- Citizen’s Card
- UMID
- PWD Card
- Other valid government-issued ID with a photo
Frequently Asked Questions
Is SIM card registration mandatory in the Philippines?
Yes, SIM card registration is mandatory in the Philippines.
Can foreigners register SIM cards in the country?
Yes, foreigners can register SIM cards in the Philippines.
What happens if I don’t register my SIM card?
If you fail to register your SIM card in the Philippines, you may face the following consequences:
- Service Disruption: Mobile service providers in the Philippines require users to register their SIM cards to activate them. If you don’t complete the registration process, your SIM card may be deactivated, resulting in a disruption of mobile services such as making or receiving calls, sending text messages, or accessing mobile data.
- Legal Compliance Issues: The National Telecommunications Commission (NTC) in the Philippines requires all SIM cards to be registered to prevent anonymous or unauthorized SIM card usage. By not registering your SIM card, you would violate the regulations set by the NTC and may face legal consequences.
- Limited Access to Services: Besides potential service disruption, unregistered SIM cards may have limited access to certain services. For example, you may be unable to reload or top-up your SIM card credits, subscribe to data plans, or avail of promotional offers without completing the registration process.
- Inability to Use Mobile Banking or E-Wallet Services: Many mobile banking and electronic wallet services in the Philippines require users to have registered SIM cards for security purposes. Failure to register your SIM card may prevent you from using these digital financial services, such as transferring money, paying bills, or making online purchases.
To avoid these consequences, it is highly recommended to register your SIM card in compliance with the regulations set by the mobile service provider and the NTC.
How long does the registration process take?
The registration process typically takes less than 10 minutes.
How to register Philippine SIM card smart?
To register your Smart or TNT SIM card in the Philippines, you can visit the Smart SIM Registration portal at https://simreg.smart.com.ph/. Alternatively, you can also register your SIM card by visiting http://www.smart.com.ph/simreg. You will need to input your personal information and upload a valid ID. Once you have completed the registration process, you will receive an SMS confirmation and may be eligible for free data.
How to register TNT SIM card online registration?
To register your TNT SIM card online in the Philippines, you can follow these steps:
- Insert your TNT SIM into your smartphone and enable the mobile data connection.
- Visit the official TNT SIM registration website at https://simreg.smart.com.ph/. The same website is used for Smart subscribers.
- Fill in the required information, including your personal details and the SIM card number.
- Upload a valid ID and submit your registration.
- Wait for an SMS confirmation and get free data
Can I register 2 SIM cards in one name?
Yes, it is possible to register multiple SIM cards in one name. According to an article from Manila Bulletin, there is no limit to the number of SIM cards that can be registered under one person or company account. However, it is important to note that the National Telecommunications Commission (NTC) advises caution when registering multiple SIM cards, as losing any of them may lead to unauthorized usage by other people.
Is barangay ID valid for SIM registration?
Yes, a Barangay ID or Barangay Residency Certificate is valid for SIM registration in the Philippines as long as it meets the requirement of being a government-issued identification with a photo. However, it is important to note that the requirements for SIM registration may vary depending on the telecommunications company and the regulations set by the National Telecommunications Commission (NTC). It is best to check with your telecom provider for the complete list of valid IDs for SIM registration.
Other Important Notes
Take note that SIM Registration is FREE OF CHARGE for any telco. Be wary of scammers who may steal your personal identification.
The deadline for sim card registration is on April 26, 2023. It may be extended by DICT so stay tuned for more updates.
The penalty will be imposed for those who provide false information, a spoofer of a registered SIM, a seller of a stolen SIM, or those who refuse to register their SIM for no valid reason.
Note: Details posted on this page may be updated as of writing. Please check your telco’s official websites for future updates.
Have you registered your SIM already? How was your experience? Share it with us in the comment section below!
Follow the Out of Town Travel Blog on Facebook, Twitter, Instagram, and Pinterest if you want more travel and tech-related updates.
Read:
- Smart opens SIM Registration portal for Smart and TNT subscribers
- Guide to Motorcycle Registration in the Philippines
- The Complete List of Mobile Number Prefixes in the Philippines 2021


