

 Team Out of Town
As someone who travels often, I’ve learned that the little things can make a big difference on the road. Being able to pay for coffee without digging through my bag, buy something quickly at the airport, or settle a restaurant bill without pulling out my wallet is one of those small conveniences I really appreciate.

Use Apple Pay with Apple Watch in the Philippines
That’s where Apple Pay on Apple Watch comes in.
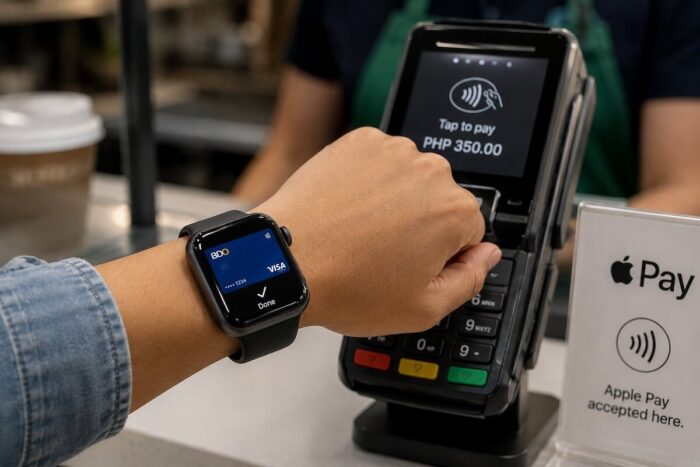
If you have a compatible Philippine credit or debit card, you can add it to your Apple Watch and use your wrist to make contactless payments at participating merchants. There’s no need to take out your iPhone every time you want to pay. Just double-click the side button on your watch, hold it near the payment terminal, and wait for the confirmation.
For travelers, this can be surprisingly useful. When you’re carrying luggage, a camera, shopping bags, or a backpack, having a payment card on your wrist means one less thing to worry about.
Here’s what you need to know about using Apple Pay with Apple Watch in the Philippines.
What Is Apple Pay on Apple Watch?
Apple Pay is Apple’s digital payment service that lets you add eligible credit and debit cards to your Apple devices.
Most people are familiar with using Apple Pay on an iPhone, but you can also use it on an Apple Watch. In many situations, I find the watch even more convenient because I don’t have to reach into my pocket or bag.
The process is simple.
When you’re ready to pay, you double-click the side button on your Apple Watch and hold the display close to a contactless payment terminal.
That’s it.
Your watch communicates with the terminal using NFC, the same basic technology behind many tap-to-pay transactions.
For someone who travels frequently, this is particularly handy. You might be carrying a suitcase through an airport, holding a camera while sightseeing, or juggling shopping bags. Reaching for your wrist is often much easier than finding your wallet.
What Do You Need to Use Apple Pay?
Before you start tapping your Apple Watch at stores and restaurants, there are a few things you need.
You’ll need:
- A compatible Apple Watch
- A compatible iPhone
- An eligible Philippine credit or debit card
- An Apple Account
- A passcode on your Apple Watch
- Compatible versions of iOS and watchOS
- A merchant that accepts contactless payments
The most important part is making sure your card is supported.
Not every Philippine-issued card can necessarily be added to Apple Pay. Even when a particular bank participates in Apple Pay, some individual cards may not be eligible.
So before getting too excited about leaving your wallet at home, check whether your particular card is supported.
How to Set Up Apple Pay on Your Apple Watch
The setup is fairly easy, but I strongly recommend doing it before you travel.
The last thing you want is to be standing at an airport checkout counter trying to verify your card while everyone behind you is waiting.
Open the Watch App
On your iPhone, open the Watch app.
Tap My Watch, then look for Wallet & Apple Pay.
This is where you manage the cards available on your Apple Watch.
Add Your Card
Tap Add Card and follow the instructions.
If you already use the card with Apple Pay on your iPhone, you may be able to add it to your watch from there. Otherwise, you can enter the card information or scan your physical card.
The process is generally straightforward.
Complete Verification
Your bank may ask you to verify the card before you can use it.
Depending on the bank, this could involve a text message, email, phone call, or verification through the bank’s mobile application.
Complete the required steps and wait for your card to be approved.
Once everything is done, the card should appear as an available payment card on your Apple Watch.
How to Pay Using Apple Watch
This is the easy part.
When you’re ready to pay:
- Double-click the side button on your Apple Watch.
- Your default card will appear.
- If you want to use another card, select it.
- Hold your watch’s display close to the contactless payment terminal.
- Wait for the tap, beep, or other confirmation.
You don’t normally need to open Wallet manually.
Once you get used to it, the whole process becomes almost automatic.
You see the payment terminal, double-click the button, tap your wrist, and you’re done.
Do You Need to Take Out Your iPhone?
No.
That’s one of the things I like most about using Apple Pay on an Apple Watch.
Once the card has been properly added to your watch, you can make supported contactless payments without pulling your iPhone out of your bag.
Think about how useful that can be while traveling.
You’re walking through the airport with a suitcase. Your phone is buried inside your backpack. You stop for coffee.
Instead of unpacking everything, you simply tap your watch.
The same thing happens when you’re carrying shopping bags or taking photos while exploring a destination.
It’s a small convenience, but after several days of traveling, you really start to appreciate it.
Do You Need an Internet Connection?
Not every Apple Pay transaction requires you to have an active internet connection at that moment.
This is particularly useful when traveling overseas.
You might be using an eSIM only for occasional data, have limited connectivity, or simply be somewhere with poor reception. That doesn’t necessarily prevent your Apple Watch from making a supported contactless payment.
However, you still need connectivity for certain setup, verification, account, and device-management functions.
That’s why I recommend setting everything up while you’re still at home in the Philippines.
Don’t wait until you arrive at your destination.
Where Can You Use Apple Pay in the Philippines?
You can use Apple Pay at participating merchants that accept contactless payments and the payment network associated with your card.
Look for the familiar contactless symbol at the checkout counter.
Depending on the merchant, you may be able to use Apple Pay at restaurants, cafés, supermarkets, convenience stores, shops, hotels, and other businesses equipped with compatible terminals.
But don’t assume that every establishment accepting credit cards also accepts Apple Pay.
This is especially important in smaller businesses.
Sometimes a merchant may accept cards but still require you to insert or swipe the physical card. Other times, the terminal may technically support contactless payments but simply not be working.
When in doubt, ask.
Using Apple Pay While Traveling Abroad
This is where I think Apple Pay becomes especially useful for Filipino travelers.
If you travel frequently, you’ll eventually notice how different payment habits can be from one country to another.
Some destinations are heavily cash-based. Others are almost completely comfortable with contactless payments.
In countries where Apple Pay and contactless payments are widely accepted, your Apple Watch can become a very convenient travel companion.
Imagine walking around Tokyo and stopping at a convenience store for a drink. Or grabbing coffee in Singapore before heading out sightseeing. Or buying something quickly in Hong Kong.
Instead of reaching for your wallet every time, you can simply use your watch.
Of course, acceptance varies from country to country and merchant to merchant, so don’t assume that Apple Pay will work everywhere.
I still recommend carrying a physical card and some cash.
Don’t Forget About Foreign Transaction Fees
Here’s something that often gets overlooked.
Apple Pay makes paying easier, but it doesn’t magically eliminate your bank’s fees.
If you’re using a Philippine-issued card overseas, your transaction may be converted from the local currency into Philippine pesos. Depending on your card, you may also be charged a foreign transaction or currency conversion fee.
Before traveling, check your card’s terms and conditions.
If you have several credit cards, this is also a good time to compare their overseas fees.
A card with travel rewards might sound attractive, but a card with lower foreign transaction fees could sometimes make more sense for everyday purchases abroad.
Is Apple Pay Safe?
For me, security is one of the biggest reasons to consider using Apple Pay while traveling.
When you use Apple Pay, your actual card number isn’t simply passed along to the merchant.
Apple uses device-specific payment information and security codes for transactions.
That means you’re not repeatedly handing over your physical card when you make purchases.
This can be reassuring when you’re traveling somewhere unfamiliar.
Of course, Apple Pay isn’t a magic shield against fraud. You should still monitor your transactions, protect your devices, use a strong passcode, and contact your bank if something looks suspicious.
Think of Apple Pay as another layer of security—not a replacement for common sense.
What Happens If You Lose Your Apple Watch?
This is something I would think about before traveling.
If your Apple Watch is lost or stolen, don’t simply assume everything will be fine.
Use Apple’s device-management tools to secure the device and take appropriate steps to protect your payment cards.
It’s also a good idea to contact your bank if you believe your card information or account could be at risk.
I also recommend keeping your bank’s customer-service information somewhere other than your phone.
A note saved in your travel documents or written down somewhere secure can be extremely useful if your phone and watch disappear at the same time.
What If Your Apple Watch Battery Dies?
This sounds obvious, but it’s easy to forget.
An Apple Watch is still an electronic device, and electronic devices need power.
If your watch battery dies during a long day of sightseeing, don’t expect it to be your only payment method.
That’s why I never recommend traveling completely dependent on Apple Pay.
Carry a physical card.
And if you’re going somewhere where cash is still widely used, keep some local currency with you too.
It’s a simple backup that can save you a lot of stress.
Can You Add Multiple Cards?
Yes, provided the cards are eligible.
Having multiple cards can actually be useful for travelers.
For example, you might have one card that earns travel rewards, another with lower overseas transaction fees, and a debit card that you keep for emergencies.
You can select the appropriate card when making a payment.
Personally, I think it’s worth taking a few minutes to organize your cards before a trip.
It saves time later, especially when you’re standing at a checkout counter trying to decide which card to use.
Apple Pay vs. Physical Card for Travelers
I don’t think it’s necessary to choose one or the other.
They serve different purposes.
Apple Watch
- Convenient
- Fast
- Easy to use while carrying luggage
- No need to pull out your wallet
- No need to hand your physical card to the cashier
- Useful for everyday purchases
Physical card
- Works when contactless isn’t available
- Doesn’t have a battery
- Useful for hotel deposits
- Useful for car rentals
- Important for certain authorization holds
- Essential as a backup
For me, the best setup is simple: Apple Pay for convenience, physical cards for backup.
Hotels and Car Rentals Are a Different Story
One mistake travelers sometimes make is assuming Apple Pay can replace their physical credit card everywhere.
That’s not necessarily true.
Hotels often need a card for security deposits or authorization holds. Car rental companies can have similar requirements.
Even if the hotel restaurant happily accepts Apple Pay, the front desk may still ask for a physical card for your room deposit.
If you’re renting a car, check the rental company’s requirements before leaving home.
Bring the physical card associated with the reservation if one is required.
What If Apple Pay Doesn’t Work?
Don’t panic.
It happens.
First, check whether the terminal actually supports contactless payments.
If it does, try positioning your Apple Watch closer to the reader. Sometimes the NFC reader isn’t exactly where you expect it to be.
You can also try the transaction again.
If you have several cards on your Apple Watch, try another one.
And if nothing works, simply use your physical card.
There is no prize for spending ten minutes troubleshooting a payment terminal while a line of people waits behind you.
If your card repeatedly fails at different merchants, contact your bank to find out whether the card has been blocked, declined, or requires additional verification.
My Apple Pay Travel Checklist
Before leaving the Philippines, I would recommend doing a quick checklist.
Set up Apple Pay before your trip. Don’t wait until you’re overseas.
Test your Apple Watch. Make a small purchase locally to make sure everything works.
Charge your watch every night. Make it part of your regular travel routine.
Bring at least one physical card. Keep it somewhere safe and separate from your primary wallet if possible.
Carry some emergency cash. Technology isn’t accepted everywhere.
Check overseas fees. Know what your bank charges for international transactions.
Save your bank’s contact information. Don’t rely solely on your phone.
Keep your devices updated. Install important software updates before traveling.
Protect your passcode. Your Apple Watch is now connected to your payment cards, so device security matters.
Is Apple Pay on Apple Watch Worth Using in the Philippines?
If you already own an Apple Watch and have a supported Philippine card, I think it’s definitely worth trying.
The appeal isn’t really about replacing your wallet completely. It’s about making everyday payments a little easier.
Once you get used to it, paying for small purchases becomes almost effortless.
You’re carrying your camera? No problem.
Your phone is inside your backpack? No problem.
You’re holding shopping bags? Just use your wrist.
And when you’re traveling abroad, that convenience becomes even more noticeable.
Still, I wouldn’t recommend leaving your physical wallet completely behind.
A smart traveler always has a backup.
Final Thoughts
Technology has changed the way we travel, from mobile boarding passes and eSIMs to translation apps, digital maps, and now contactless payments on our wrists.
Apple Pay on Apple Watch fits naturally into that travel lifestyle.
It’s quick, convenient, and designed with security in mind. For everyday purchases, it can save you from constantly reaching for your phone or digging through your bag for a credit card.
But the best travel technology is technology you can rely on without becoming completely dependent on it.
So set up Apple Pay before your trip, test it at home, keep your watch charged, and understand how your bank handles international transactions.
Then keep a physical card and some emergency cash tucked safely away.
That way, whether you’re buying coffee in Manila, shopping in Tokyo, or having dinner somewhere overseas, you have options.
And when all you need is a quick tap to pay, your Apple Watch is already right there on your wrist.
Want more Updates? Please follow #TeamOutofTown on Facebook, Twitter, Instagram, and Pinterest for more travel ideas.
Read:
- Apple Pay Philippines: Everything Travelers and Everyday Users Need to Know
- 15 Smart Travel Hacks for Budget-Conscious Filipino Frequent Flyers

